A while back, I wrote about building a personal red teaming knowledge base on GitHub - a version-controlled collection of command references and notes meant to eliminate the friction of constantly googling syntax I use every day. That project has held up well. It is still the first place I look when I forget an nmap flag or a Kerberoasting one-liner.
But over time, a new kind of friction crept in. A markdown file is great for looking things up when you already know roughly what you are looking for. It is much less great when you are staring at a two-hundred-line exploit script someone handed you and just want it explained, or when you want to generate a variation of something instead of copy-pasting and manually adapting it. Browsing static notes does not scale to that kind of work. What I actually wanted was something I could talk to.
So this project picks up where the last one left off: turning a pile of markdown and scripts into something queryable. The result is a fully local, self-hosted AI setup that can explain, generate, and reason about offensive security scripts on demand - without sending a single byte of it to a cloud provider. Below is the full build, step by step, including the parts that did not work on the first try.
Why Local, and Why Not Just Use a Hosted Assistant
Hosted AI assistants are good at a lot of things, but they are built for a general audience, and that shows the moment you paste in a reverse shell script and ask for a line-by-line breakdown. Even with entirely legitimate learning intent, you run into refusals, hedging, or watered-down explanations that leave out exactly the detail you needed. That is a reasonable default for a product used by millions of people, but it is not a good fit for daily offensive security work.
Running everything locally solves that in two ways. First, there is no ambiguity about intent to negotiate with - the model is configured for this specific use case from the start. Second, none of it - scripts, notes, questions - leaves my machine. For anything touching client engagements or unreleased research, that matters more than convenience.
The hardware requirement turned out to be more modest than expected. This runs entirely on a desktop with an RTX 4070 (12GB VRAM), no dedicated server or cloud GPU rental involved.
The Stack
Three pieces, each doing one job:
Ollama - runs the model locally and exposes it over a simple local API. No cloud round-trip, no rate limits, no account.
An abliterated Qwen3-14B - a fine-tuned build of Qwen3 with its refusal behavior removed via abliteration, a technique that directly edits the model's weights rather than retraining it. Capability is unchanged; what changes is the willingness to actually answer.
AnythingLLM - wraps the model in a proper RAG (Retrieval-Augmented Generation) layer. This is what turns "a chatbot" into "a chatbot that actually knows my scripts and reference material."
The abliteration part deserves an honest note: removing refusal behavior also removes the model's only safety net. There is no second opinion in the loop anymore - just me. For a controlled, offline, single-user research setup that is an acceptable trade, but it is worth being deliberate about rather than treating it as a free upgrade.
Setting It Up
1. Install Ollama and pull the model
Ollama installs like any normal Windows application and auto-detects the GPU via CUDA, no manual driver wrangling needed:
# after installing from ollama.com, verify it's running
ollama --version

# pull the abliterated Qwen3-14B
ollama pull richardyoung/qwen3-14b-abliterated

# quick sanity test
ollama run richardyoung/qwen3-14b-abliterated
At Q4 quantization the model sits comfortably inside 12GB of VRAM, leaving headroom for a reasonable context window. Worth checking GPU utilization in Task Manager during the test run to confirm it's actually hitting the GPU and not silently falling back to CPU.
2. Install Docker Desktop
AnythingLLM ships as a container, so Docker Desktop comes first:
winget install --id Docker.DockerDesktop --exact --accept-package-agreements --accept-source-agreements
A reboot is required afterward for the WSL2 backend to hook in cleanly. If Docker complains about an incomplete WSL2 installation on first launch, wsl --update followed by another restart clears it.
3. Run AnythingLLM
docker run -d --name anythingllm \
  -p 3001:3001 \
  -v anythingllm-storage:/app/server/storage \
  -e STORAGE_DIR="/app/server/storage" \
  --cap-add SYS_ADMIN \
  mintplexlabs/anythingllm
That STORAGE_DIR variable matters more than it looks. Leave it out and the container starts, then immediately crashes with a Node.js path error the moment it tries to write to disk - an easy hour to lose the first time you hit it. docker logs anythingllm is the fastest way to catch this kind of thing if a container doesn't show up in docker ps after startup.
Once it's running, http://localhost:3001 opens the setup wizard. The account created here is local only, nothing phones home.
4. Connect AnythingLLM to Ollama
In Settings > LLM Provider, select Ollama. The one detail that trips people up: since AnythingLLM runs inside a container, localhost refers to the container itself, not the Windows host running Ollama. The base URL needs to be:
http://host.docker.internal:11434
The model dropdown then picks up richardyoung/qwen3-14b-abliterated automatically.
5. Generate a GitHub token, then build out the knowledge base
For the GitHub imports, a personal access token is worth generating first (GitHub Settings > Developer settings > Personal access tokens, public_repo scope only, nothing else needed for public repos). Unauthenticated GitHub API calls cap out at 60 requests/hour, which a repo of any real size will blow through fast.
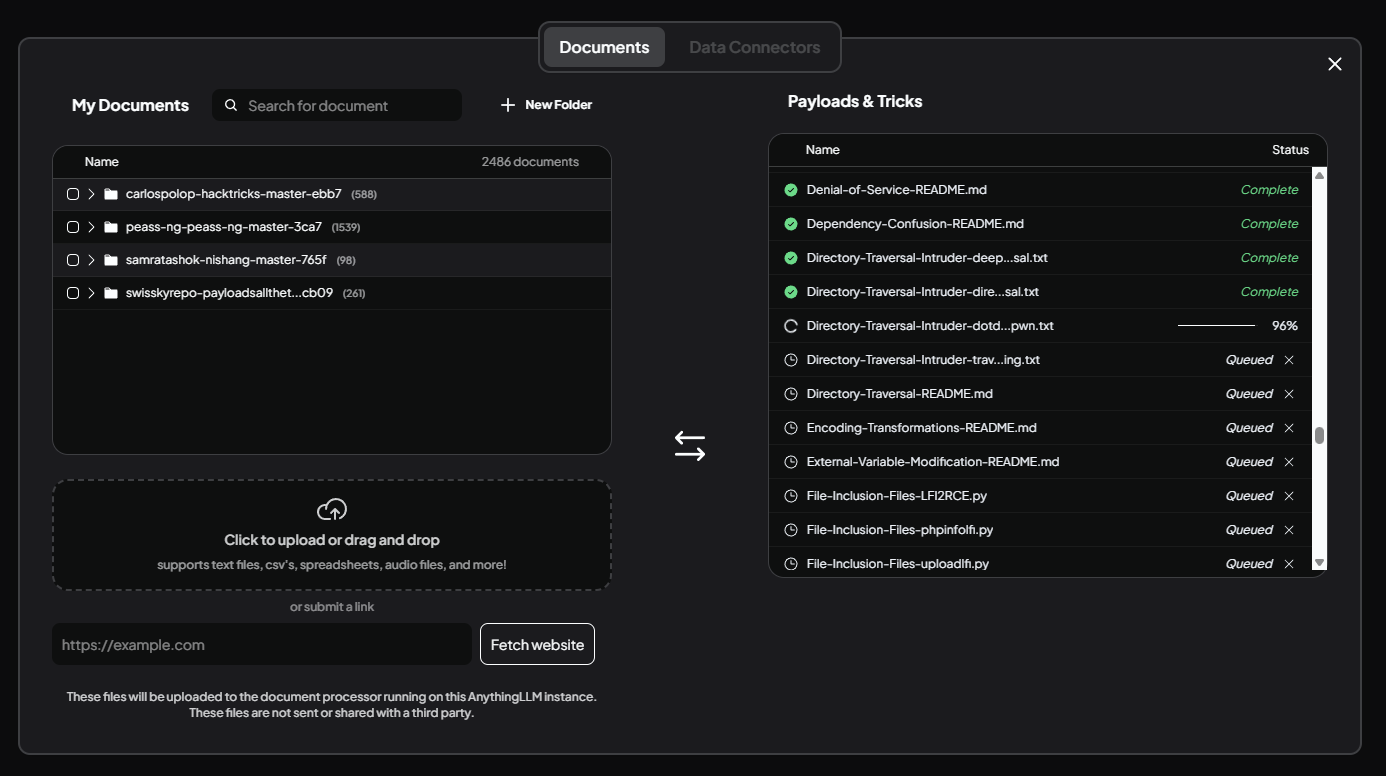
Importing itself is simple: open a workspace, upload icon, Data Connectors tab, GitHub Repo, paste the URL and token, fetch, then drag the resulting file list into the workspace. After moving files into a workspace, nothing actually gets embedded until Save and Embed is clicked - easy step to miss, and the files will just sit there unsearchable until it's run.
Rather than dumping everything into one workspace, I split the sources into three, grouped by how I actually use them - vector search gets noticeably less precise once payloads, credential material, and social engineering content all sit in the same embedding space.
Workspace: Payloads & Tricks
The general-purpose reference layer, covering most web vulnerability classes plus the two things that stay current without any manual work on my part:
PayloadsAllTheThings and HackTricks for payloads, bypasses, and methodologyGTFOBins and LOLBAS for living-off-the-land binary abuse on Unix and Windows respectively
SecLists for wordlists and fuzzing payloads
nuclei-templates - the one entry here that's genuinely on today's date rather than evergreen, with new CVE templates landing multiple times a week
Exploit-DB as the canonical PoC archive
Workspace: PowerShell & PrivEsc
Scripts and tooling for the post-foothold phase, from local privilege escalation up through domain compromise:
PEASS-ng (linPEAS/winPEAS) and Nishang for privesc checks and offensive PowerShell
Impacket for SMB/Kerberos/DCE-RPC attacks
BloodHound for mapping Active Directory attack paths
Mimikatz for credential extraction
NetExec for network enumeration and lateral movement
Rubeus for Kerberos ticket manipulation
Workspace: Social Engineering & Phishing
Kept fully separate from the other two, since it's the one category where the tooling doubles as real-world infrastructure rather than pure reference material:
Gophish, King Phisher, and SET for campaign simulation and awareness testing
Evilginx2 and Modlishka for reverse-proxy phishing with session/MFA bypass
That last pair is worth flagging on its own. Unlike a privilege escalation script that only does anything once you already have a foothold in a test environment, a phishing framework's entire output is aimed at a real inbox the moment it's live. There's no technical difference between an authorized test and an actual attack - the only thing separating them is scope and consent. Documenting how the tools work is one thing; running them is a different decision entirely, and one I'm not making lightly.
6. A couple of loose ends
Two small things needed fixing after the initial setup. First, the chat defaulted to Agent mode rather than plain Chat - fine for tool-calling workflows, unnecessary overhead for straightforward Q&A, switched back under Chat Settings. Second, Qwen3's reasoning traces were leaking into the visible response instead of staying internal, and a plain-English instruction in the system prompt didn't fix it - Qwen3 controls its thinking mode through a dedicated control token baked into the chat template, not through natural-language requests. Appending it directly solved it:
/no_think
Does It Actually Work
The honest test is asking it something specific enough that a generic answer would be obviously wrong. Pointing it at a question about winPEAS's privilege escalation checks or asking it to reproduce the structure of a Nishang reverse shell function returns answers that are clearly grounded in the imported source, not just general model knowledge - AnythingLLM surfaces the source file alongside the answer, which makes that easy to verify rather than take on faith.
For the actual use case - handing it an unfamiliar script and asking for a walkthrough - it holds up well. Response times land in the fifteen-to-thirty-second range for a typical explanation, which is a fair trade for something that runs entirely offline and costs nothing per query.
What's Next
This is very much a living setup rather than a finished one. A few things on the list:
Continuing to expand each workspace as gaps show up during real use, rather than trying to front-load completeness
Testing whether a larger model, even at the cost of some CPU offload, meaningfully improves explanations for more involved exploit chains
Eventually feeding it my own writeups from this blog, closing the loop between what I document publicly and what the assistant can reference privately
Like the knowledge base project before it, the value here comes from actually using it, not from how complete it looks on day one. It already saves real time during script analysis, and that alone justifies the setup.